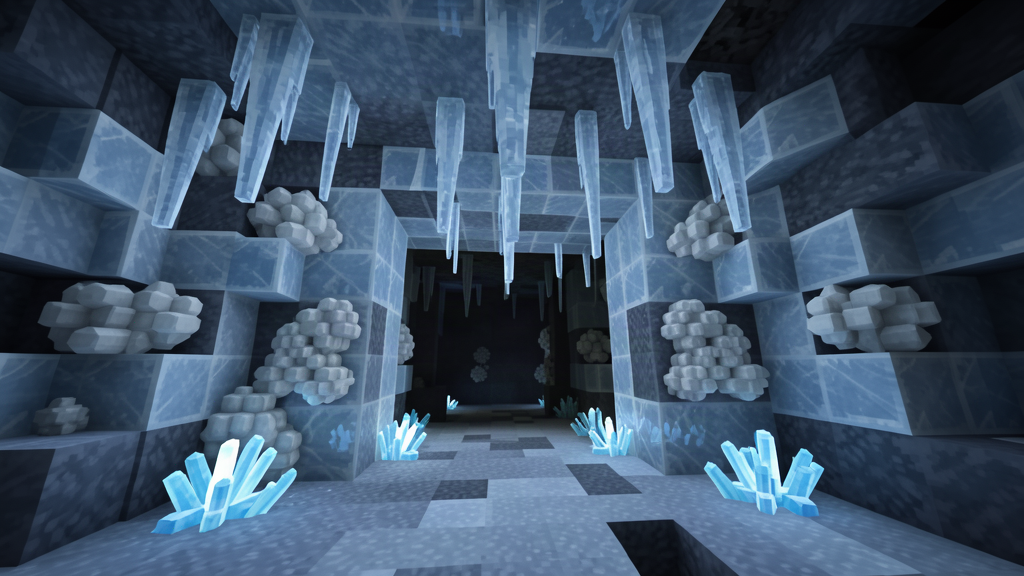

The Ice Caves biome is the headline addition in Minecraft's 26.4 winter drop - a frozen underground cavern system packed with new blocks, a chilling new mob, and environmental hazards that punish careless exploration. This guide covers everything you need to know to survive, farm, and build in the coldest biome Mojang has ever added.
What Are Ice Caves?
Ice Caves are a new cave biome introduced in Minecraft 26.4 Snapshot 3 (Java Edition) and Preview 26.60.29 (Bedrock Edition), as part of the "Drop 4 of 2026" winter update announced at Minecraft LIVE on September 26, 2026. They are the fifth Overworld cave biome, joining lush caves, dripstone caves, the deep dark, and sulfur caves.
The biome generates underground beneath colder Overworld biomes - primarily snowy plains, snowy taigas, frozen oceans, and ice spikes. It consists mainly of Packed Ice and Calcite, with icicles hanging from ceilings, ice crystals glowing on floors, patches of snow, and ores embedded in pockets of Stone and Deepslate. Notably, Glow Lichen, Dirt, and Granite do not generate here.
The atmosphere borrows the Ice Plains Spikes visual settings: pale blue-tinted sunlight at half brightness, gray fog, and the coldest color grading of any biome.
For a complete breakdown of all changes, see our Minecraft 26.4 Snapshot 3 patch notes analysis.
How to Find Ice Caves
Generation Rules
- Primary locations: Under snowy plains, snowy taigas, frozen oceans, and ice spikes at high weirdness values
- Rare locations: Occasionally under cold biomes like taigas
- Surface breakthroughs: Extremely rare, but may leak out of cave openings or ravines
- Exclusion zones: High humidity or continentalness replaces them with lush or dripstone caves
Practical Search Strategy
- Start in a cold biome - snowy plains, taigas, frozen oceans, or ice spikes.
- Dig at a staircase angle to spot the transition from stone to packed ice and calcite.
- Look for the visual shift - packed ice walls with calcite blobs, hanging icicles, and faint ice crystal glow. If you see regular stone and glow lichen, you're in a normal cave.
- Explore connected cave systems in cold biomes rather than digging blindly.
- Check ravines that cut through cold biomes for direct exposure.
Pro tip: Use a seed map tool to locate the nearest cold biome to spawn, then dig down there.
For a complete breakdown of all changes, see our Best Minecraft Seeds for Cold Biomes (2026).
Frostbite Mob Mechanics & Combat Strategies
The Frostbite is the update's new hostile mob - a zombie variant built entirely around ice mechanics. It was described as a "frozen zombie" at Minecraft LIVE, but its in-game name is Frostbite.
Spawn Locations
Surface (night/thunderstorms): Snowy Plains, Ice Spikes, Frozen Ocean, Frozen River, Snowy Slopes, Jagged Peaks, Frozen Peaks
Underground (light level 0): Ice Caves - spawn weight 50/520 (9.62%)
Conversion: Zombies and husks transform into Frostbites after ~30 seconds in powder snow - same pattern as drowned conversion, relevant for farming.
Combat Statistics
| Stat | Value |
|---|---|
| Health | 24 HP (12 hearts) |
| Armor | 2 points (with armor) |
| Melee | Easy: 2.5 / Normal: 3 / Hard: 4.5 + Freezing (3s) |
| Ranged | Ice Ball: 1-4 damage (velocity-scaled) |
| Type | Undead (Smite works, Instant Health harms) |
Attack Patterns
Frostbites fight like drowned, with two modes:
Melee (primary): Within 2 blocks, zombie-style melee dealing damage + Freezing for 3 seconds. Unlike husks, can apply Freezing while holding a weapon.
Ranged (situational): Some spawn holding Ice Balls, thrown at targets within 16 blocks. Deals 4 damage at close range, scaling down with velocity. Frostbites also pick up Ice Ball items off the ground.
Mode switching: Within 2 blocks, Frostbites switch from ranged to melee. Closing the gap reduces Ice Ball chip damage but exposes you to Freezing melee hits.
Key Traits
- Immune to Freezing and powder snow - not slowed by either
- Powder snow walker - stands on top without sinking
- Sunlight vulnerability - burns like regular zombies
- Water transformation - reverts to regular zombie if underwater too long
- Baby variants - with dedicated melee and Ice Ball animations
- Bedrock jockeys - 15% of baby Frostbites can ride other mobs (BE only)
Combat Strategies
1. Ranged-first (recommended): Use a bow or crossbow to eliminate Frostbites before they close distance. Avoids both Ice Ball chip damage and Freezing melee hits. A well-enchanted bow takes them down in 2-3 hits.
2. Shield up for Ice Balls: If a Frostbite holds Ice Balls, raise your shield as it approaches. The projectiles deal knockback - anchoring behind a shield prevents being pushed into hazards.
3. Close the gap carefully: If fighting in melee, rush in to force melee mode - but block or dodge the Freezing hit. A shield is essential.
4. Smite is your friend: As undead, Frostbites take extra damage from Smite. A Smite V sword often one-shots them on Normal.
5. Sunlight trap: Lure Frostbites into sunlight - they burn like regular zombies.
6. Water conversion: Push a Frostbite into water and keep it there - it reverts to a regular zombie, losing Freezing and Ice Ball attacks. Safer but slower.
For a complete breakdown of all changes, see our Minecraft Undead Mob Farm Guide - Drowned, Husks & Now Frostbites.
Freezing Effect Countermeasures
The Freezing effect is the signature mechanic of the 26.4 winter drop. It's a new status effect that functions similarly to standing in powder snow - but with important differences.
What Freezing Does
- Causes visible shaking and reduces jump height
- Deals damage over time - the longer it persists, the more damage
- Slows movement and progressively freezes the affected entity as if in powder snow
Duration Sources
| Source | Duration |
|---|---|
| Frostbite melee hit | 3 seconds |
| Potion of Freezing | 45 seconds |
| Extended Potion of Freezing | 1 minute 30 seconds |
| Splash Potion of Freezing | 45 seconds |
| Lingering Potion of Freezing | 11 seconds |
| Extended Lingering Potion of Freezing | 22 seconds |
| Arrow of Freezing | 5 seconds |
| Extended Arrow of Freezing | 11 seconds |
Countermeasures
1. Leather Armor (partial protection): Prevents freezing damage (like powder snow), but does not prevent the effect from being applied or remove it once active. You'll still be slowed and have reduced jump height.
2. Milk bucket: Clears all status effects, including Freezing. Keep one in your hotbar.
3. Avoid the source: The best countermeasure is avoiding Frostbite melee hits - use ranged combat, maintain distance, and use shields.
Freezing Against Mobs
Mobs affected by Freezing take additional damage, and freezing-vulnerable mobs take a 5× multiplier. Frostbites themselves are immune - the effect is useless against them. This makes Freezing potions and arrows potent tools against other hostile mobs.
For a complete breakdown of all changes, see our Minecraft Potion Brewing Guide - All Recipes & Ingredients.
New Blocks and Building Strategies
The 26.4 drop introduces two new blocks exclusive to Ice Caves, plus new uses for existing blocks.
Ice Crystal
A crystal-like block similar to Amethyst Clusters, generating on Ice Cave floors.
- Emits light level 4 - the only natural light source in Ice Caves
- Can be placed on any side of a block (floor, wall, or ceiling)
- Breaks if its support block is removed
- Non-renewable - the ones that generate are the only ones you get
- Any tool can mine it; a pickaxe is fastest
- Currently renders smaller than intended (known preview issue)
Building applications: Safe lighting for ice builds (light level 4 won't melt ice or trigger icicle falls), atmospheric glow for winter-themed bases, and wall/ceiling accents.
Icicle
A speleothem-like block in the same family as Dripstone and Sulfur Spikes.
- Can naturally grow up to 5 blocks long (downward only, in darkness, never in the Nether)
- Melts and breaks when exposed to strong light - a torch can dislodge it
- Falling icicles deal damage; floor icicles (stalagmites) double fall distance for damage
- Icicles cannot grow stalagmites naturally - upward-pointing ones are always player-placed
- Player-placed icicles do not melt from light
- Breaks with any tool; pickaxes are fastest
Building applications: Floor spike traps (doubled fall damage), ceiling decorations, redstone contraptions using light-triggered melting, and defensive chokepoints.
Packed Ice & Calcite
- Packed Ice: Makes up most walls and terrain. Drops nothing without Silk Touch. 9 packed ice crafts 1 blue ice - the fastest ice for boat roads.
- Calcite: The pale white partner to ice terrain. Excellent for white building palettes and contrast.
- New in 26.4: Snow can now be placed on Packed Ice directly.
Building Strategy Summary
| Goal | Blocks |
|---|---|
| Safe lighting around ice | Ice Crystals (light level 4) |
| White/pale palette | Calcite + Packed Ice |
| Fast transportation | Blue Ice (9 Packed Ice) |
| Hazard traps | Icicles (floor for doubled fall damage) |
| Atmospheric builds | Icicles (ceiling) + Ice Crystals (floor/walls) |
For a complete breakdown of all changes, see our Minecraft Blue Ice Boat Road Guide - Fastest Transportation.
Loot Table and Resource Priorities
Frostbite Drops
| Item | Quantity | Notes |
|---|---|---|
| Rotten Flesh | 0-2 | Up to +1 per Looting level |
| Ice Ball | 0-3 | Up to +1 per Looting level; stacks to 16 |
Ice Balls feed an entire crafting chain: throwable weapon (4 damage, velocity-scaled), brewing ingredient for Freezing potions (Awkward Potion + Ice Ball), and path to Arrows of Freezing (Lingering Potion + 8 arrows or cauldron dipping).
Ore Generation
Ores generate inside blobs of Stone and Deepslate within the packed ice - look for grey patches in ice walls. Tunnelling through packed ice alone won't find ores. All standard ores follow normal Y-level distribution, plus andesite and diorite.
Resource Priority
- Ice Balls - Only source is Frostbite kills; stockpile for brewing.
- Ice Crystals - Non-renewable, exclusive to Ice Caves; collect on first visit.
- Ores - Follow normal Y-level rules in stone/deepslate pockets.
- Packed Ice - Bring Silk Touch; 9 packed ice crafts 1 blue ice.
- Calcite - Common elsewhere; lower priority.
- Icicles - Abundant; grab a few for traps.
For a complete breakdown of all changes, see our .
First 30 Minutes Survival Checklist
Follow this checklist when entering your first Ice Cave to maximize survival and resource gathering:
Before You Descend
- [ ] Equip leather armor (at minimum leather boots) - prevents Freezing damage from powder snow and Frostbite melee hits
- [ ] Bring a shield - essential for blocking Ice Balls and Frostbite melee attacks
- [ ] Pack a bow or crossbow with at least 32 arrows - ranged combat is the safest way to handle Frostbite
- [ ] Bring a Smite-enchanted sword as backup - Smite deals massive damage to undead Frostbites
- [ ] Carry a milk bucket - clears Freezing effect instantly
- [ ] Bring Silk Touch pickaxe - packed ice drops nothing without it
- [ ] Pack building blocks (at least 2 stacks) - for emergency shelters, bridging, or blocking off threats
- [ ] Bring food - at least a stack of cooked meat or equivalent
- [ ] Carry torches - but use them carefully near icicles (see below)
Entering the Cave
- [ ] Scan the ceiling before placing any light - torches can dislodge icicles, causing them to fall and deal damage. Place lights away from hanging icicle clusters.
- [ ] Mark your path - use blocks, torches, or a trail of items to find your way back. Ice Caves are disorienting with their uniform packed ice walls.
- [ ] Listen for Frostbite sounds - they use zombie-style audio cues. If you hear groaning, prepare for combat.
- [ ] Check for Ice Crystals on the floor - they emit light level 4 and mark safe areas. Use them as navigation landmarks.
First Encounter with a Frostbite
- [ ] Assess: is it holding Ice Balls? If yes, raise your shield and close the distance carefully, or use your bow from range.
- [ ] If it charges you, switch to melee with your shield up. Block the first hit (which applies Freezing), then counterattack.
- [ ] If you get Frozen, drink milk immediately. Don't wait - the effect deals damage over time.
- [ ] If multiple Frostbites attack, retreat to a narrow corridor where they can't surround you. Fight them one at a time.
Resource Gathering (First Visit)
- [ ] Kill 5-10 Frostbites to stockpile Ice Balls (aim for 16+ for a full brewing setup)
- [ ] Collect 10-20 Ice Crystals for building and safe lighting
- [ ] Note the locations of stone/deepslate pockets for future mining trips - don't mine on your first visit unless you're well-equipped
- [ ] Gather some icicles for trap building (5-10 is plenty)
- [ ] If you have Silk Touch, mine 64+ packed ice for blue ice crafting
Establishing a Foothold
- [ ] Build a small shelter near the cave entrance with a door and bed - Ice Caves are dark and dangerous at night
- [ ] Place a crafting table and furnace - you'll want to smelt ores and craft tools on-site
- [ ] Set up a brewing stand if you have blaze powder - start brewing Freezing potions for your next expedition
- [ ] Create an arrow-dipping cauldron if you have Lingering Potions of Freezing - dip arrows to create Arrows of Freezing
Exit Strategy
- [ ] Don't overstay. Your first visit should be reconnaissance and basic resource gathering. Come back better prepared.
- [ ] Mark the cave entrance on your map or with a visible surface marker.
- [ ] Return before nightfall if you're on the surface - Frostbites spawn at night in cold biomes above ground too.