Minecraft Potion Brewing Guide: Every Recipe & Strategy for 2026
Potion brewing is one of those features that seems complicated at first, but once you nail the mechanics, it opens up way more combat options than you'd think. Whether you're prepping for the Ender Dragon, heading into the Nether, or just want to survive longer in PvP, knowing which potions to brew and when is half the battle.
How Potion Brewing Works
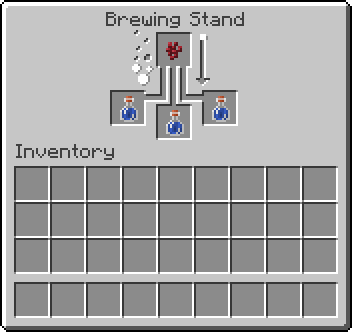
First things first: you need a brewing stand. You can craft one with three stone blocks and a Blaze rod, or just find one in a Nether fortress if you're lucky (which, honestly, I usually prefer). Stick the brewing stand down, add water bottles to the three slots at the bottom, and grab some ingredients from the top slot.
Here's the thing about brewing that catches people off guard: the order matters. In Minecraft 26.1.2, you're always starting with a base ingredient in that top slot. The stand pulls from whatever's sitting there, and then you wait for the bubbles to stop. That's your primary potion. Once you've got that, you can add secondary ingredients (called modifiers) to turn it into something else entirely.
Water bottles are your foundation. Awkward potions are the intermediary step most recipes need. And then you've got your final potions, the ones that actually do something useful in the field.
Primary Potions: The Core Recipes
Let's start with Nether Wart. Throw one in the top slot with water bottles below, wait 20 seconds, and you've got Awkward Potion. And this is the gateway ingredient for basically everything else. You're going to need a lot of these if you're serious about brewing, so stock up on Nether Warts from the Nether or a farm.
Redstone dust creates Potions of Fire Resistance. Throw it into Awkward Potions and you're immune to lava and fire damage for 3 minutes. This is non-negotiable if you're heading into the Nether or fighting Blazes. The extended version (with another Redstone) lasts 8 minutes, which honestly feels wasteful unless you're doing a serious exploration run.
Ghast tears turn Awkward Potions into Healing potions. These instantly restore health (2 hearts per drink, or 4 hearts if you drink the improved version). Healing potions are expensive to make because Ghast tears are annoying to farm, so most people I know save them for survival situations or boss fights.
Magma cream gives you Fire Resistance, but it's bulkier to farm than Redstone. Brown mushrooms and red mushrooms grow in the Nether. Combine them with Slimeballs and you've got Magma cream. Some servers or worlds might make you prefer one method over the other depending on what's easily accessible.
Combat Potions: Strength, Speed, and Damage
Strength is everything in PvP.
Blaze powder goes into Awkward Potions to create Potions of Strength. You get 3 minutes of extra damage (adds 3 damage per hit if you're on Normal difficulty). The extended version lasts 8 minutes. If you're planning any kind of combat server activity, you're brewing these constantly.
Sugar makes Potions of Swiftness (speed boost). This one's useful more often than people realize. Running away from danger? Speed potion. Need to kite mobs? Speed potion. Building something that requires quick movement? Speed potion. The base version lasts 3 minutes and speeds you up by 20%. Extended version is 8 minutes.
Golden carrots create Night Vision potions. You see perfectly in darkness for 3 minutes. It's not a necessity like Strength is, but if you're doing cave exploration or mining at night, it's convenient. No extended version though, just the base recipe.
Pufferfish is weird. One raw Pufferfish in an Awkward Potion gives you Water Breathing. You can stay underwater indefinitely for 3 minutes. Sounds niche, but if you're exploring ocean monuments or just want to grab something from the ocean floor, this saves you from drowning. Finding Pufferfish in warm ocean biomes takes effort, so don't waste these lightly.
Defense and Utility Potions
Turtle Master potions come from scute (the drops from baby turtles growing up). These are genuinely one of the best defensive potions in the game. You get Resistance IV (take way less damage) for 20 seconds, but you also get Slowness IV (move slower). It's a trade-off, yeah, but if you're tanking damage while your team deals it out, this is your answer.
Fermented Spider Eyes are crafted from Spider Eyes, Brown Mushrooms, and Sugar. They turn any potion into a Potion of Invisibility. You're invisible for 3 minutes, mobs ignore you (mostly), and other players can't see your name tag. Super useful for escape strategies or approaching mobs stealthily. Note that attacking while invisible breaks it immediately.
Invisibility has a weird interaction most people don't realize: you can still ride horses and mobs, and they stay invisible with you. I tested this on a few servers trying to grief-test our defenses, and it caught admin attention fast. Worth knowing if you're on a PvP server with actual rules.
Enhanced and Extended Potions: The Modifier Layer
Once you've brewed a primary potion, you're not done. That's where secondary ingredients come in. Most potions have an Extended version (lasts longer) and an Enhanced version (stronger effect). Here's the thing, some have both options.
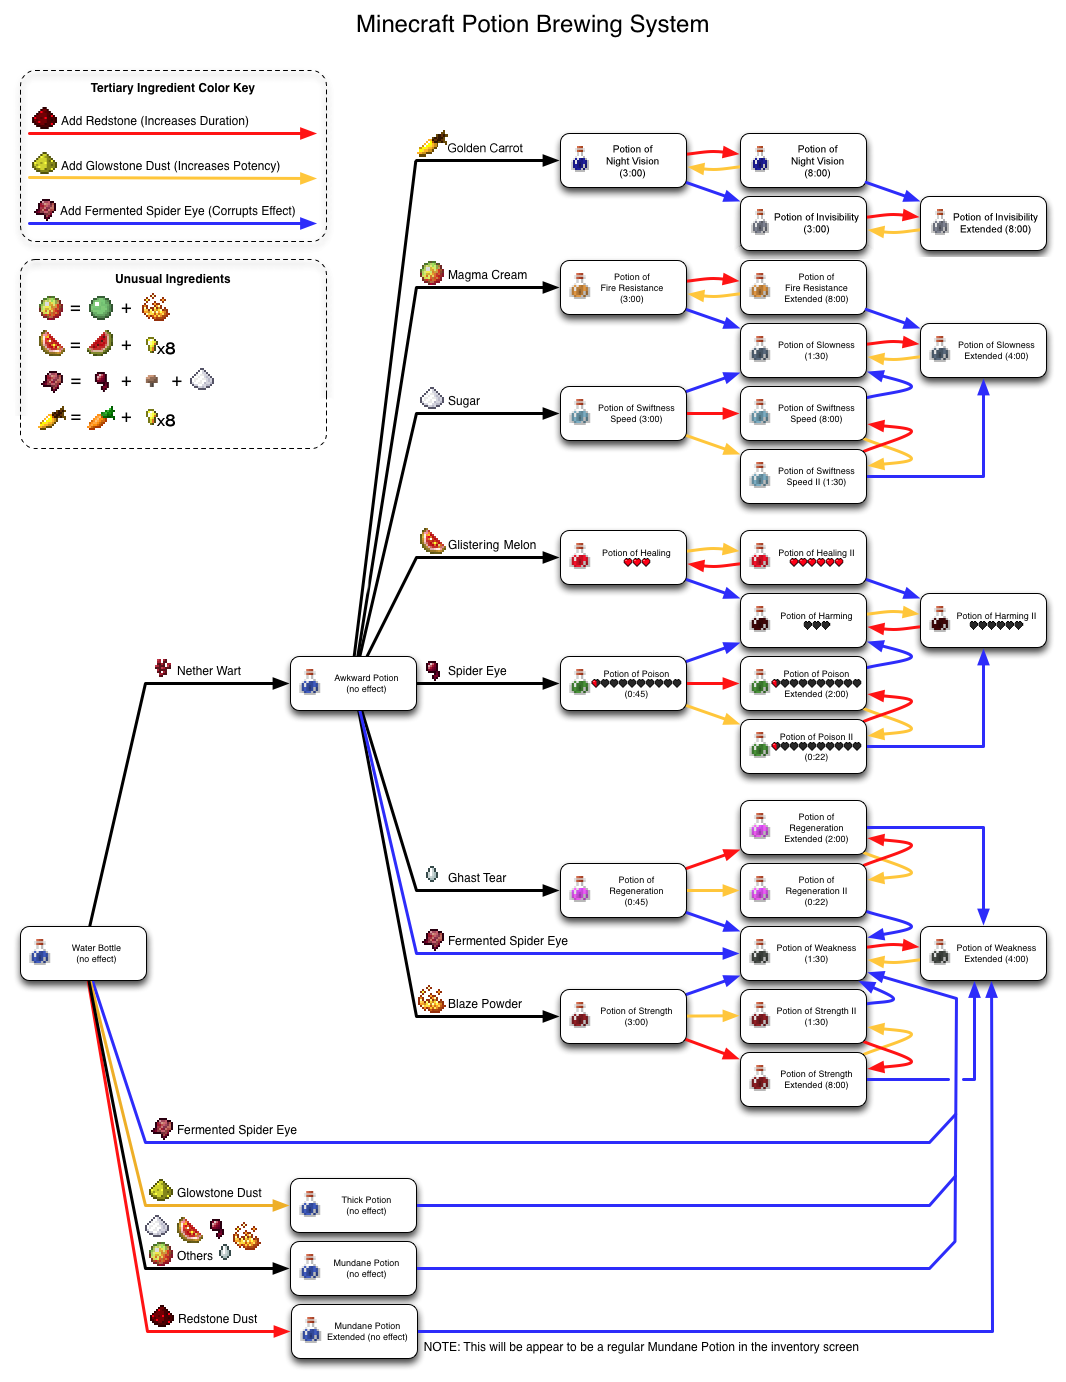
Redstone redstone extends duration. Throw your primary potion (already brewed) in the stand with Redstone in the top slot, and it lasts significantly longer. Glowstone does the opposite for most potions: it boosts the effect's strength but shortens the duration. This is useful if you want to tank 8 minutes of Fire Resistance instead of 3, or if you want Strength II for 1:30 instead of Strength I for 3 minutes.
But here's the catch: not every potion can be enhanced. Healing, Night Vision, Invisibility, and Water Breathing can't be modified. They just do what they do. You can only extend Healing potions in your crafting table (combine with Redstone for splash potions), but that's outside the brewing stand.
Splash and Lingering Potions: Area Effects
Gunpowder turns regular potions into splash potions. These explode and affect everything in the radius, not just you. Throw a Splash Potion of Healing at your team and everyone nearby gets healed. Throw a Splash Potion of Poison at a mob and it takes damage.
Dragon's Breath (obtained by standing in the Ender Dragon's purple breath attack and using glass bottles) creates Lingering Potions. These leave a cloud behind when thrown that affects anything walking through it. Lingering Strength? Forget about it. You're looking at maybe 5-10 seconds of effect. They're more novelty than practical on most servers.
Farming the Ingredients: Where to Start
Nether Warts need Nether blocks and light. Build a simple farm in the Nether with Soul Sand and light it up. Let them grow and harvest regularly. You'll want stacks of these.
Blazes drop Blaze Rods, which craft into Blaze Powder. You actually need Blaze Powder to brew Strength potions and to make the brewing stand itself. Most people set up a Blaze farm near a fortress or just grind them when needed.
If you're doing serious exploration or building projects, use our block search tool to track down biomes where specific crops spawn naturally. Saves time versus random hunting.
Ghasts are a pain to farm, but their tears are valuable. Build a safe platform high in the Nether, aggro them from a distance, and hope they spit at you where you can catch the tears. Actually, that's annoying. Most people just stockpile a few and use them sparingly.
Tips for Brewing Efficiently
Batch your work. Don't brew one potion. Set up multiple brewing stands if you can (get the materials together, it's worth it). Load all three water bottle slots and brew everything at once. Three potions per batch means you're 3x faster than single-bottle brewing.
Label your potions in a chest with signs so you don't grab the wrong one mid-fight. Nothing worse than chugging Poison thinking it's Strength.
Keep a separate inventory section for ingredients. I keep mine organized by color: red things (Redstone, Ghast tears), brown things (Mushrooms, cocoa), and so on. Takes literally seconds to grab what you need without digging through 30 slots of randomness.
If you're setting up a server or creative build and need to organize player resources, check out the whitelist creator to manage who's got access to your brewing area.
Common Mistakes (So You Don't Make Them)
Forgetting that certain potions can't be extended or enhanced. You'll waste ingredients trying to modify Healing or Invisibility. They just don't work that way.
Not preparing Fire Resistance before heading into the Nether. First time I played seriously, I died instantly to lava because I didn't have a single Fire Resistance potion on me. Lesson learned: never enter the Nether without it.
Brewing too many potions you don't need. Space is precious in your inventory. Brew what you're actually going to use, not entire stacks of random potions.
Actually, minor correction: you can carry more potions if you organize them properly in separate slots and combine stacks as needed. But yeah, don't overbrew.
The last one: not realizing that haste potions don't exist as a brewing recipe. If you want Haste, you need beacon towers with Lapis. The game does let you apply Haste with commands, but vanilla brewing doesn't give you the potion directly. Caught a lot of people trying to farm that one.
Lead writer at minecraft.how. Long-time Minecraft player running a small SMP server, testing every build, mod, and seed before writing about it.